


Fender dent repair involves assessing damage and using tools like metal detectors, heat guns, and vacuum bagging systems for precision. Efficient repairs rely on investing in quality tools, including dent pullers and precision sets for targeted removal of paint without further damage. Inspect the fender, select appropriate tools based on damage size and depth, protect surrounding areas, and follow a four-step process: lift metal, clean, and prepare for further stages.
Looking to fix those pesky fender dents yourself? This comprehensive guide is your go-to resource. We’ll walk you through understanding fender dent repair techniques and equip you with the best tools for efficient, precise fixes. From identifying damage to choosing the right kit, we cover it all. By following our step-by-step instructions, you’ll be able to tackle those dents head-on and restore your vehicle’s smooth exterior.
- Understanding Fender Dent Repair Techniques
- Top Tools for Efficient and Precise Repairs
- Step-by-Step Guide: Using Your Chosen Tool Kit
Understanding Fender Dent Repair Techniques

Fender dent repair is a specialized skill that involves various techniques to restore damaged car bodies, focusing on the front and rear bumpers—the fenders. Understanding the process is key to ensuring effective fixes. The first step in fender dent repair is assessing the damage, which can range from minor dents to significant creases or even cracked parts. Professionals use tools like metal detectors, which help identify hidden damage beneath the surface. Once the extent of the damage is clear, the repair process begins, often involving a combination of methods.
One common technique is using specialized hammers and dolly tools to gently pull out and reshape dented areas back to their original form. This method is effective for shallow dents and requires precision and skill to avoid further damage or leaving unsightly marks. For deeper dents, patchwork and painting might be necessary. This involves cutting out damaged sections, fitting new patches, and then expertly applying car paint repair techniques to blend the repairs seamlessly with the rest of the vehicle’s body. Many collision repair centers employ advanced tools like heat guns and vacuum bagging systems for more complex fender dent repairs, ensuring precision and a factory-like finish.
Top Tools for Efficient and Precise Repairs
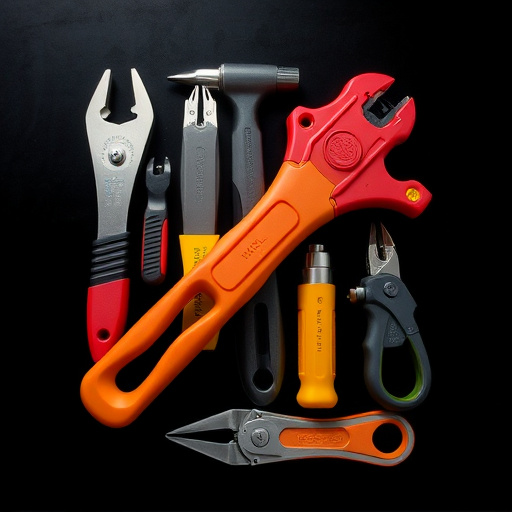
When it comes to achieving efficient and precise fender dent repair, the right tools make all the difference. For a start, an auto repair shop should invest in a good quality dent puller. This handy device uses air pressure to gently pull out dents, leaving minimal traces and ensuring a smooth finish. It’s particularly useful for smaller dings and creases that can often be overlooked but significantly impact a vehicle’s appearance.
Additionally, a set of precision tools such as picks, paddles, and brushes designed specifically for car scratch repair and fender dent repair is essential. These tools allow for targeted and controlled removal of damaged paint without causing further harm to the surrounding area. For more complex cases involving car collision repair, an auto body hammer and putty knives can help reshape and restore contorted metal panels. Using these professional-grade tools ensures that repairs are not only effective but also executed with the utmost care, leaving your vehicle looking like new.
Step-by-Step Guide: Using Your Chosen Tool Kit

To begin your fender dent repair journey, gather your tool kit and prepare for a meticulous process. Start by inspecting the damage closely – identify the size, depth, and location of the dent. This step is crucial as it determines the best course of action. Next, select the appropriate tool from your kit; a variety of options are available depending on dent size, from simple handheld picks to more advanced pneumatic tools.
Follow these steps:
1. Protection: Cover the surrounding area with masking tape to prevent paint transfer.
2. Tool Selection: Choose a tool that matches the dent’s dimensions. For larger dents, use a putty knife or pry bar to pop out the damaged metal. For smaller, shallower dents, a dent pick or roller will be more effective.
3. Removal: Carefully work the tool under and around the dented panel, gently lifting it until the dent is freed. Be patient and precise; force can cause further damage.
4. Cleaning: Once removed, clean the area thoroughly to remove any debris and ensure a smooth finish during the next stage.
Fender dent repair is no longer a daunting task with the right tools. By understanding various repair techniques and selecting efficient, precise options, you can restore your vehicle’s exterior to its former glory. With practice and the right step-by-step guide, achieving professional results is well within reach. Remember, investing in quality tools tailored for fender dent repair can significantly impact the outcome and save time in the long run.